Saturday 8 July 2017

Alien Squad Leader: Imperial Strike Force v Far Eastern Corporate Mercenaries

Last week at the club bristolwargaming.co.uk I played a 150 point game of Alien Squad Leader against Richard. We were using the playtest rules for the upcoming version 3.

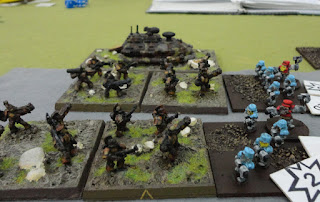
My strike force are made up of power armoured infantry, and APCs plus a light vehicle. Most had aiming devices and there were a few other upgrades. Richard's  corporate mercenaries are the Star Vikings range from Alternative Armies. They include power armoured Samurai stormtroopers, Ninjas, Ashigaru support squads, some armoured fighting vehicles and a sword master charactor.

We rolled the take and hold scenario which means the defending army can't break as long as it has more units in the objective area than the enemy. Normally this would suit my army fine, I'd rush up in my transports, using my free pre-game move, get lots of troops into the objective and close assault. But this enemy have a special rule where they can capture a unit instead of inflicting damage in combat, since many of his troops are as good as mine in combat this becomes a huge risk for me.

Richard set up the terrain and I moved a hill to give me a sheltered approach to the objective giving no opportunity for enemies to set up on overwatch. After I deployed Richard was able to deploy his Ninjas in the rough ground on the left of the picture. I had to unload some of my troops to deal with them. A combination of command faliurs and badly positioning units without room to get past them led to my advance stalling for several turns.
Richards AFVs moved round my right and were able to shoot at my units around the hill. The Ninjas withdrew and I moved into the objective area. The Swordmaster attacked my troops on the hill alongside the Ninjas and inflicted about 3-4 hits before returning to the objective. The Ninjas later jumped back out again and captured on of my units and pulled them into the wood. I had to let them go since if I chased them the wood would prevent me doing anything before they reached his table edge and they were gone.
There were a series of melees in which Richards command stands were badly damaged and withdrew. Some of my vehicles were destroyed an my captured stand was taken off table, counting as as lost for the break point. One of my commands stands which was still behind the hiss charged the damaged Ninjas and destroyed them.

The Swordmaster managed to capture 3 of my units. These counted as half a break point and having taken lost some units my army reached it's break point.


Every army has strengths and weaknesses and this was a difficult one to face. The Mercenaries have a fairly small army so it takes a lot to escort units of the field, but my army was even smaller and so having even odds of being captured made mellee very risky, and since the scenario demanded I enter the objective impossible to avoid. Even so, there were points in the game when I had the upper hand and looked like I might win. Fun as always.


Saturday 1 July 2017

More Kings of War: Orcs v Dwarves

Last week I played Alex and his Dwarves in a 2,000 point pitched battle, at the club bristolwargaming.co.uk

I took 4 hordes of axe (yes I'm going to spell it the British way), 2 troops of Skulks (bows), a regiment of Gore Riders and a horde of Trolls. My heroes were a Crudger on Winged Slasher, a Flagger and a God Speaker. Most of my models are from the 80's and have fought under various editions of Warhammer in the past.
Facing me on my left were Rangers, Shield Breakers and Ironclad, in the centre a horde of Ironclad, a regiment of Ironguard, and a regiment of Bezerkers. On my right 2 organ guns and some Ironwatch (crossbows). There were 5 characters including a Warsmith who boosted the artillery.
I chose to go second, meaning Alex would have to shoot while I was further away. I made a general advance but kept the magic item, giving one Axe the Pathfinder ability, unrevealed since they couldn't clear the wood in one turn anyway. Throughout the game I was taking heavy missile casualties.
On my left my Gore Riders soaked up a lot of missile hits from the Rangers who were shooting and falling back, but I eventually charged them and almost destroyed them, but.were themselves then charged in the flank and front and destroyed. My Orcs burst through the woods and wheeled onto the hill. The Ironclads moved out of their charge arc but I got them with my Trolls and wiped them out.


 In the centre the Bezerkers charged another horde and bounced off, my horde then charged them and destroyed them. The Bezerker Lord alongside them spent the rest of the game charging one unit after another in the flank and rear and survived the game.
On my right a horde the Dwarf artillery and Ironwatch destroyed one horde and then poured fire into two more. My Skulks moved up and shot an organ gun to death.


 Later, after a few turns of battling 2 units, I destroyed the Iron Guard, casting Bane Chant to boost my Orcs. I then got front and flank charges on the Dwarf horde and destroyed it. But both my units were finished off by missile fire leaving an empty space in the middle of the field. I pulled my 2 characters out of range for the final turn.


Back on the left my Krudger broke cover and finished of the Rangers, my Axe destroyed the remaining unit. In the last turn they each charged a Dwarf character, with both surviving by about one hit.

We rolled for an extra turn and the game ended with an Orc victory, having more points left on the table. My fourth game of KoW and my first victory, fun as always.